Showing posts with label girl. Show all posts

Tuesday, 11 October 2016

Steampunk Playing Cards part 1.

 “Once you’ve accepted your flaws, no one can use them against you.”
George R. R. Martin, "A Game of Thrones"

For some strange and unexplained reason I'm working mostly on graphic designs and environment/architectural designs, which means that I'm using only pens/pencils and graphic tablet on daily basis.
As the time went by I began to suspect, that I'm going to forget how to make watercolor illustrations until one day...
a proposal from one of the leading Polish card manufacturer ("Trefl") came.
The offer concerned making set of cards in a Steampunk style. Handmade, watercolor technique, victorian aesthetics, steampunk subjects - PERFECT!
Some of my previously done artworks were also welcome to be part of the deck (ie "Train", "Steampunk Landscape").


Working process started with thinking (what a surprise!).

CONCLUSION 1 - Jokers could be presented as goblins, Aces as buildings, Kings could be portrayed as bearded guys, Queens as cute ladies (congrats Evi, how unusual) and Jacks could be robots. After discussion with the client  we decided to put vehicles on cards with numbers.

CONCLUSION 2 - each color could be designed as a different...how to put it right... subculture?
hearts would be members of the "upper classes" , clubs should be inventors/researchers fascinated with steampunk technical achievements, spades could be pirates or sea travelers and diamonds could be a charming mix of goths and dandies with a touch of decadence.


That's just a little sample of what you can expect to see in the deck. Next posts will reveal more :)

Thursday, 29 October 2015

Snow Queen


Recently I decided to enrich my portfolio with an illustration for a classic tale. After short considerations my choice fell on "Snow Queen". 
I had a very clear idea in mind, both regarding composition and details. It doesn't happen very often, but this time I didn't need to make a single concept sketch (tripple HURRAY! as I don't like to waste much time on personal projects). Therefore the first step was...


1. A full-size pencil sketch:

2. Detailed ink drawing. At this stage I begun to regret the idea with a town from aerial view...

3. First layer of watercolors. Before adding paint, I splashed masking fluid with a toothbrush to make "snow".


4. Details. They were mainly added with brown ink (outlines) and white ink (more snow!). 

To make the frost on the rose I used salt, which absorbed water from wet paint and created such a fancy texture.

THE END

Thursday, 20 August 2015

Female Portraits


How about making an exercise from painting female characters with watercolors? Yaaay!

To be honest watercolors aren't the easiest technique of making portraits. Drawing realistic people requires a very high level of accuracy, while watercolor technique is quite often perceived as series of "controlled accidents". When I googled "watercolor portraits", the vast major of searching results presented a very painterly style - sort of unfinished faces with colorful splashes around them. But the good news is that there were also a few extremely accurate artworks! 

This exercise was made in a way I usually paint buildings. The only difference was that this time I decided to follow strictly photo references (most of my buildings are painted totally from imagination). Special thanks to stock models: http://faestock.deviantart.com/ http://nastiaosipovastock.deviantart.com/  http://mirish.deviantart.com/ and http://chirinstock.deviantart.com/ !


The first step is a pencil sketch. The more accurate it is, the easier it will be to paint over it with watercolors. Tool: a mechanical pencil (0.5 mm, lead hardness H) - it should prevent from smearing. Luckily I chose yellowish paper, so the coffee stain is almost invisible :) 

To achieve a skin color I mixed yellow and red in different proportions along with adding different amount of water to it. For shadows I was also adding a little bit of violet. This brush appeared to be very useful. I used it for the whole work (except the background and some clothes):


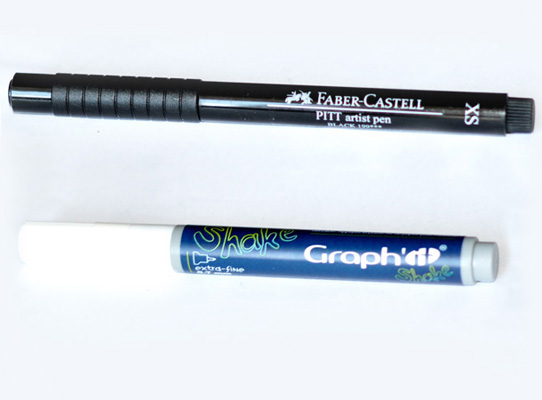
Just as in case of drawing buildings, I used a thin waterproof pen (size XS) for making contours. Metal details were highlighted with a white opaque marker. I was using it for the first time so I had no idea what kind of results should I expect. For me it's like a very thin corrector (0.7 mm):


During such exercises you probably won't have an opportunity to fully express your creativity or move into the world of imagination, but hopefully it will improve your attention to details, proportions and light. Strongly recommended from time to time!


Friday, 19 September 2014

"Red River"


"The river ran red. My daughter waded knee deep in the crimson cascades and raised waves with her outstretched fingers. The flashes from the reporters’ cameras froze her playful splashes in place for a series of eternal moments."

Benjamin Jacobson "By This You Shall Know".


According to the earlier announcement today's post is dark and grim. Well, maybe not the post itself but an illustration for a short story of Benjamin Jacobson " By This You Shall Know ". The story is set in the near future and presents one of the biblical plagues. Little girls can be quite creepy, right?
Zgodnie z wcześniejszą zapowiedzią dzisiejszy wpis będzie mroczny. Może nie tyle sam wpis, co ilustracja do opowiadania Benjamina Jacobsona "By This You Shall Know". Przedstawia ona jedną z biblijnych plag w opowieści rozgrywającej się w niedalekiej przyszłości. Przyznacie, że małe dziewczynki potrafią być nieco straszne?


1. A delicate sketch which won't tell you too much. In fact these are only remains  of a proper sketch after erasing it (only what was necessary for the later painting is still here). I thought that the illustration would make a bigger impact if the girl looked straight forward with hands outstretched toward the viewer.
1. Delikatny, niewiele mówiący szkic. W zasadzie to tylko pozostałości po przetarciu właściwego szkicu gumką (pozostało tylko to, co niezbędne dla późniejszego nakładania akwareli). Uznałam, że ilustracja zrobi większe wrażenie, jeśli dziewczynka będzie patrzyła wprost na widza, wyciągając ręce w jego kierunku.

2. Well, well, after using some brown paint everything became clear! Color scheme will be set in a "retro style". Somehow this should help to create an unreal atmosphere.
2. No proszę, wystarczyło użyć nieco brązowej farby i od razu widać znacznie więcej! Kolorystyka będzie w stylu "retro" - to powinno pomóc w utrzymaniu nieco odrealnionej atmosfery.

3. Masking fluid ("this yellow thing")is needed to cover the water, which should be red in the end. In this way it won't be accidentally painted over. I'd like to clarify, that masking fluid stops being a fluid after several minutes and changes into a sort of a gum, which can be easily pulled-off .
3. Płyn maskujący ("to żółte") jest potrzebny do zasłonięcia wody, która docelowo ma być czerwona. Dzięki temu nie zostanie przypadkowo zamalowania. Uściślę tylko, że płyn maskujący przestaje być płynem już po kilku/kilkunastu minutach i staje się czymś, w rodzaju łatwej do odczepienia gumy. 

4. Details: dress's texture is a result of using salt on a wet watercolor paint. White flashes were scratched with a paper cutter.
4. Detale: tekstura sukienki to efekt użycia soli na mokrej akwareli, natomiast białe rozbłyski zostały wydrapane nożykiem do papieru.

5. And here's the final piece:
5. A oto i ostateczna wersja:

Friday, 21 February 2014

Fantasy Pond


"God said take what you want...and pay for it." 
 Stephen King, "Desperation"


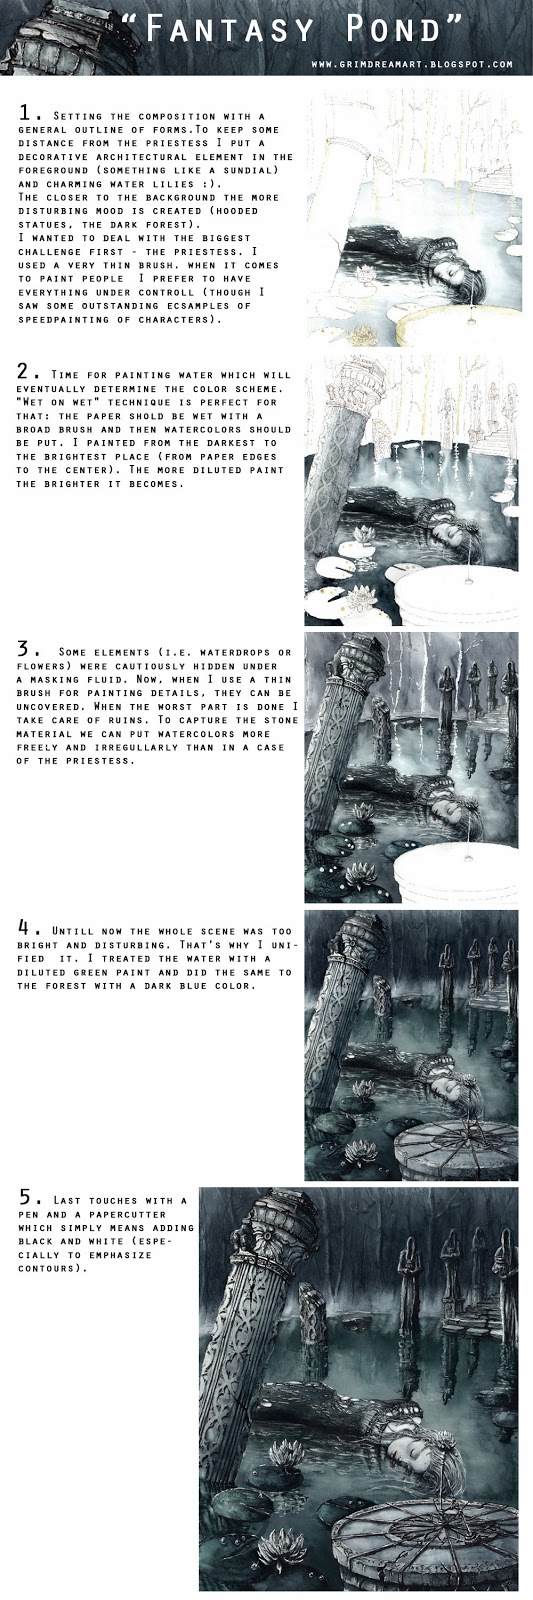
Personal works have this certain advantage (and disadvantage) that the subject is absolutely unrestricted. I decided to do something which I do not  very often (though sometimes it happens ) which is adding a human figure to my landscapes. The idea evolved from a  forest nymph flying over swamps to a priestess in ruins of a half-flooded shrine. At the last moment I decided  to deprive of consciousness the main (and the only) character to make the scene little more intriguing .

Rysunki personalne mają tą zaletę (a zarazem wadę), że ich tematyka jest absolutnie dowolna. Postanowiłam więc zrobić coś, co nieczęsto mi się zdarza (chociaż się zdarza!) - wpleść do moich krajobrazów ludzką postać. Pomysł ewoluował długo i mozolnie od przedstawienia leśnej nimfy nad mokradłem do kapłanki w ruinach na wpół zatopionej świątyni. Żeby ilustracja była nieco bardziej intrygująca, niemal w ostatniej chwili postanowiłam pozbawić przytomności główną (i w sumie jedyną) bohaterkę tej sceny.


1. Setting the composition with sketching a general outline of forms.To keep some distance from the priestess I put a decorative architectural element in the foreground (something like a sundial) and charming water lilies :). The closer to the background the more disturbing mood is created (hooded statues, the dark forest).
I wanted to deal with the biggest challenge first which was the priestess itself. In case something would go wrong, I could start drawing one more time without wasting too much time.

1. Ustawienie kompozycji za pomocą ogólnego zarysu brył. Żeby nabrać nieco dystansu do bohaterki, umieściłam na pierwszym planie ozdobny element architektoniczny (coś na kształt zegara słonecznego) oraz urocze lilie wodne :) Im dalszy plan, tym niepokój bardziej narasta (zakapturzone posągi i ciemny las).
 Postanowiłam na samym początku zmierzyć się z największym wyzwaniem - kapłanką. Gdyby coś poszło niezgodnie z planem, mogłabym rozpocząć rysunek od początku, nie tracąc zbyt wiele czasu.

2. Time for painting water which will eventually determine the color scheme. "Wet on wet" technique is perfect for that: the paper should be wet with a broad brush and then watercolors should be put.  I painted from the darkest to the brightest place (from the paper edges to the center). The more diluted watercolor paint the brighter color becomes.

2. Czas na wodę, która ostatecznie zdeterminuje całą kolorystykę. Technika "mokre na mokrym" polega na zmoczeniu kartki czystą wodą za pomocą szerokiego pędzla. Akwarela jest nakładana od najciemniejszego do najjaśniejszego miejsca, czyli w tym wypadku od brzegów kartki do środka. Rozjaśnienie uzyskuje się dzięki stopniowemu dodawaniu coraz większych ilości wody do akwareli.

3. Some elements (i.e. waterdrops or flowers) were cautiously hidden under a masking fluid. Now, when I use a thin brush for painting details, they can be uncovered. When the worst part is done I can breathe a sigh of relief and take care of ruins. To capture the stone material we can put watercolors more freely and irregullarly than in case of the priestess.

3. Pewne elementy (np. krople wody czy kwiaty) zostały przezornie zakryte płynem maskującym. Teraz, kiedy przerzucam się na malowanie detali drobnym pędzlem, mogą zostać odsłonięte. Kiedy najgorsze jest już zrobione, można odetchnąć z ulgą i zająć się ruinami. Żeby oddać strukturę kamienia można malować znacznie bardziej swobodnie nakładając farbę w bardziej nieregularny sposób niż w przypadku kapłanki.

4. Untill now the whole scene was too bright and disturbing. That's why I unified  it. I treated the water with a diluted green paint and did the same to the forest with a dark blue color.

4. Do tej pory cała scena była zbyt jasna i rozpraszająca, dla tego postawiłam ją ujednolicić, aby uwaga skupiała się na najistotniejszych elementach. W tym celu dość rozwodnioną zieloną akwarelką potraktowałam całą powierzchnię wody, natomiast granatową - las w tle.

5. Last touches with a pen and a papercutter which simply means adding black and white (especially to emphasize contours).  

5. Ostatnie szlify piórkiem i nożykiem do papieru, czyli punktowe dodanie czerni i bieli (szczególnie po to, żeby podkreślić kontury).  

And here's a downloadable tutorial (after downloading it's much bigger of course :) ):