Sunday, 25 August 2013

Saloon

"You might not understand where my passion lies, but I know, deep down, I can't find another "
The Ongoing Concept, "You Are the One"

Last year I was working tirelessly on illustrations and graphic design for the new album "Saloon" of a band called "The Ongoing Concept" https://www.facebook.com/theongoingconcept (yes, the quote at the beginning of the post is not a coincidence :) ). The booklet was meant to look like some kind of diary in a Western-style (with sketches and handwriting texts). The album has been released this week, so I can finally show you fragments of this "diary"!

W zeszłym roku pracowałam niestrudzenie nad ilustracjami i opracowaniem graficznym nowego albumu "Saloon" zespołu "The Ongoing Concept" https://www.facebook.com/theongoingconcept (owszem, cytat z początku tego wpisu to nie przypadek :) ). Założenie graficzne było takie, żeby album przypominał dziennik z czasów "dzikiego zachodu" (z odręcznymi zapiskami i szkicami). Ponieważ premiera albumu miała miejsce w tym tygodniu, mogę się w końcu pokazać Wam fragmenty owego "dziennika"!

I scanned several homemade "old papers" - crumpled, ragged, yellowish pages stained with sepia watercolors. Then, on a graphic tablet, I made illustrations imitating pen drawings. They were based on previous hand drawn sketches. 

Zeskanowałam kilka "starych papierów" własnej roboty - pogniecione, naddarte, żółtawe kartki z plamami akwareli w kolorze sepii. Następnie, na podstawie odręcznych szkiców, narysowałam na tablecie ilustracje przypominające rysunki piórkiem. 


But the handwriting was what entertained me the most (all texts were written on a graphic tablet letter by letter). It appeared that it takes MUCH MORE time than writing on a sheet of paper. At the beginning I presented six versions of my handwriting. The winner was my favorite "Font #3" (unfortunately one of the most labor-intensive). What's even worse, I've got a nasty tendency to make spelling errors. So even though I was double checking all lyrics, guys from the band still could find some typos.

Najwięcej zabawy było jednak z pismem odręcznym (wszystkie teksty zostały napisane odręcznie na tablecie literka po literce). Okazało się, że zajmuje to ZNACZNIE więcej czasu, niż pisanie na kartce. Najpierw przedstawiłam sześć próbek mojego pisma. Wygrała moja ulubiona "Czcionka nr 3" (niestety jedna z najbardziej pracochłonnych). Do tego, ze względu na moją skłonność do robienia błędów ortograficznych, nawet po dwukrotnym sprawdzeniu przeze mnie poprawności tekstów, panowie z zespołu znajdowali literówki.  


At the end here's one of The Ongoing Concept's video - "Arrows Before Bullets" 
Na zakończenie jeden z teledysków The Ongoing Concept - "Arrows Before Bullets"


Monday, 5 August 2013

How To - "An Unpublished Illustration"


“The place where you made your stand never mattered. Only that you were there...and still on your feet.”
Stephen King, "The Stand"


Today I'm goin to  show a method of painting called  "from entirety to particularity". This artwork illustrates a story about the Thirty Years War. It was meant to be published in a cultural magazine... if the magazine would have been published. Unfortunately few days before releasing it, the publication got suspended . It's quite a pity because the story was just excellent!

Dziś pokażę metodę malowania "od ogółu do szczegółu". Poniższa praca miała ilustrować opowiadanie dotyczące wojny trzydziestoletniej, które ukazałoby się w czasopiśmie kulturalnym... gdyby owo czasopismo się ukazało. Niestety kilka dni przed terminem wydania zawieszono publikację na czas nieokreślony. Jest czego żałować, bo opowiadanie było świetne!


1. A delicate application of colors and first layer of textures. A broad brush, plenty of water, a lot of paint, lots of salt and.. a little time.

1. Delikatna sygnalizacja docelowej kolorystyki i pierwsza warstwa tekstur. Szeroki pędzel, dużo wody, sporo farby, mnóstwo soli i... mało czasu.

2. When the first layer dries up it's time for another one. Now with a thinner brush we should block colors , simulate a distance and continue defining textures of different materials (plants, ground, water etc.). Usually at this stage the drawing looks the worst. We have to get over it and  go to the next stage with faith and hope.

2. Po jako takim wyschnięciu pierwszej warstwy, pora na następną. Teraz, przy użyciu mniejszego pędzla, należy "zblokować" kolory, zacząć symulować przestrzeń i dalej definiować faktury materiałów(roślinność, ziemia, woda itp.). Zazwyczaj w tej fazie  rysunek wygląda najgorzej. Trzeba to przeboleć i przejść do następnego etapu z wiarą i nadzieją.

3. No we should grab a very thin brush and start to paint details. By the way we can unify colors (in this case I warmed colors of shadows, sky and hills in the background)and emphasize an impression of a distance (especially by adding contrasts to the nearest area).

3. Chwytamy cieniutki pędzel i przechodzimy do szczegółów. Przy okazji można ujednolicić kolory (w tym wypadku ociepliłam kolor cieni, nieba oraz pagórków w tle) oraz podkreślić przestrzeń (szczególnie przez skontrastowanie najbliższego obszaru).

I'm affraid that there won't be any brilliant punchline... just a closer look on some details:

Chmmm, obawiam się, że nie będzie żadnej błyskotliwej puenty... tylko rzut oka na detale:

Saturday, 29 June 2013

Grunge Textures


"The future is just a f*** concept that we use to avoid being alive today. So, be here now."

Six Feet Under


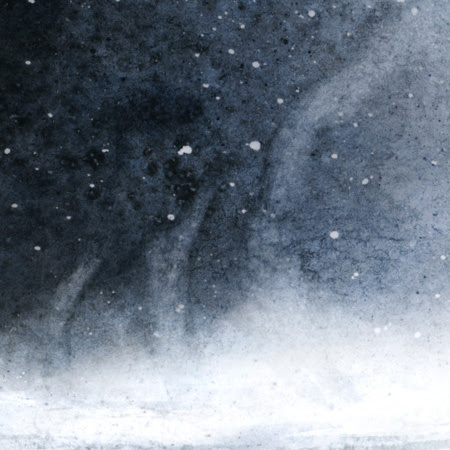
Today I'm going to show you my experimental method for creating "grunge" texture of a night sky. I tried it out when I was making a   project of a music album cover.

Dzisiaj przedstawię mój eksperymentalny sposób na otrzymanie  "grunge'owej" tekstury nocnego nieba (wypróbowałam go przy okazji projektu okładki albumu muzycznego).


1. Little white spots - it's just a white paper. They are created by splashing masking fluid with a toothbrush. We've got to take care of them at the beginning of work. When the illustration is finished and dry, we can peel off masking fluid and see little fragments of a white paper.

1. Jasne plamki - to nic innego jak czysta kartka. Powstają one przez rozpryskiwanie fluidu maskującego za pomocą szczoteczki do zębów. Trzeba o nie zadbać na samym początku malowania. Kiedy ilustracja jest skończona i sucha, można ściągnąć zaschnięty fluid maskujący, pod którym zachował się biały papier.


2. Colorful stains (well, they could be colorful if I had used more diversified colors)- we put very diluted paint on a solidly wet paper (I used here blue, green, violet and a bit of black paint). We can delicately set the paper at different angles so the stains can merge here and there into a coherent whole.

2. Wielobarwne plamy (tzn. mogłyby być w pełni wielobarwne, gdybym zastosowała bardziej zróżnicowane kolory) - na solidnie zmoczoną kartkę nakładamy bardzo rozwodnioną akwarelę w różnych kolorach (tu niebieski, oliwkowy, fiolet, odrobina czerni). Można delikatnie poruszać kartką, żeby plamy połączyły się gdzieniegdzie tworząc wrażenie spójnej całości. 


3. "Cloud-like" textures -when the watercolor paint is still wet, we push a crumpled tissue to it (right, I used a cheaper substitute - good, old toilette paper).

3. "Chmuropodobne" tekstury - Kiedy akwarela jest jeszcze mokra, przyciskamy do niej pogniecioną chusteczkę higieniczną (racja, ja używam tańszego substytutu - starego, dobrego papieru toaletowego).


4. Fog/ steam - a tactic is similar to the one from the previous point, but this time we wipe the paint harder using  a tissue with a "self-made tip".  

4. Mgła/para - taktyka podobna do tej z  poprzedniego punktu, ale tym razem wycieramy farbę mocniej, za pomocą chusteczki z "własnoręcznie ukształtowaną końcówką".


5.  Irregular texture - well know and loved salt. We drop several grains of salt on the paper with wet watercolor paint. The more wet paint and the bigger grains, the clearer results can be achieved.

5. Nieregularna tekstura - znana i lubiana sól , którą posypujemy kartkę z mokrą akwarelą (wystarczy kilka ziarenek). Im większe ziarna i bardziej mokra akwarela, tym wyraźniejszy efekt.


We've got to accomplish steps 2-5 pretty fast, when the watercolor is still wet. And when it gets dry, we can proceed the next step:
6. Little dark spots - we splash dark paint with a toothbrush. In the end we can peel off masking fluid to reveal little white spots.

Z wykonaniem punktów 2-5 trzeba się uwinąć, kiedy akwarela jest wciąż wilgotna. Natomiast kiedy wyschnie, można przystąpić do następnego kroku:  
6. Ciemne plamki - za pomocą szczoteczki do zębów rozpryskujemy ciemną farbę. Na koniec zdejmujemy fluid maskujący odsłaniając jasne plamki.


Dear watercolor painters - contrive, devise your own methods for new, interesting textures and HAVE FUN!

Drodzy akwareliści - kombinujcie, obmyślajcie własne sposoby na nowe, ciekawe tekstury i BAWCIE SIĘ DOBRZE!

Friday, 31 May 2013

Sketching, sketching...

"Actual happiness always looks pretty squalid in comparison with the over-compensations for misery." 
Aldous Huxley "Brave New World"

"Faktyczna szczęśliwość zawsze wypada blado na tle spodziewanej nagrody za nędzę"
 Aldous Huxley "Nowy Wspaniały Świat"


"How did you draw the sketch?" - that's the question I was asked several times when I tried to explain "step by step"  how my illustrations were created. Already made sketch was usually the first step. So now I decided to present as precisely as possible how it's actually drawn. I just have to warn you that it's not a lesson about perspective (obviously one post wouldn't be enough for that).

 "Jak narysowałaś szkic?" - to pytanie, które kilkakrotnie mi zadawano, kiedy próbowałam wyjaśnić  krok po kroku jak powstawały moje ilustracje. Gotowy  szkic - podrys był bowiem zazwyczaj krokiem pierwszym. Dzisiaj postanowiłam więc możliwie dokładnie pokazać jak powstaje ów podrys cienkopisem. Uprzedzam tylko, że nie jest to lekcja perspektywy (jeden wpis z pewnością by na to nie wystarczył).

 0. A concept sketch made with just any pen on an accidentally found piece of paper. For me it's quite accurate and readable... but possibly only for me.   And here's the relevant drawing:

0. Szkic koncepcyjny zrobiony na przypadkowo znalezionym skrawku papieru byle jakim pisakiem. Dla mnie jest on całkiem dokładny i w pełni czytelny, ale możliwe, że tylko dla mnie. A teraz rysunek właściwy:

1. Just a few lines but they determine what will be displayed in the frame and define placement of vanishing points. At the beginning of drawing I use a very tired pen approaching to the end of its way to the dustbin. However it still leaves delicate lines on paper.

1.To zaledwie kilka kresek, ale pokazują one , co właściwie zmieści się w kadrze oraz określają, gdzie mniej więcej znajdują się punkty zbiegu. Na początku używam bardzo wysłużonego  cienkopisu, który zbliża się już do kresu swojej drogi na śmietnik, jednak zostawia jeszcze bardzo delikatne ślady na papierze.

2. Basic divisions of the block and general draft of most significant elements. At this stage lots of elements can be inadequate so it's better to draw poorly visible lines.

2. Podstawowe podziały bryły i ogólny zarys ważniejszych elementów. Na tym etapie sporo elementów może być "nietrafionych", więc bezpieczniej jest  rysować ledwo dostrzegalnymi liniami.

3. Finally it's time for brand new pen! We emphasize what's important in our previous sketch and ignore guide lines and marks drawn not where they are needed. By the way we add further divisions. To be honest that's probably the most challenging stage.

3. Wreszcie pora na nowiutki cienkopis! Wydobywamy to, co jest istotne w dotychczasowym szkicu ignorując pomocnicze linie konstrukcyjne i kreski postawione w nieodpowiednich miejscach. Przy okazji dodajemy kolejne podziały. Prawdę mówiąc to chyba najbardziej wymagający etap.

4. Drawing outlines of ornaments. Watching lots of references before that can be really helpful.

4. Zarysy ornamentów. Dobrze jest zapoznać się wcześniej z wieloma przykładami ornamentów.

5. Further detailing.

5. Dalsze zagłębianie się w detale. 

6. Materials, textures and ... oh ... plants.

6. Materiały, faktury i... o... roślinki.